The first days of the calf’s life!
A large measure of success of the calf program is determined by the colostrum program. For the purpose of this post, we will assume that you are doing a great job there with more than 70% of he serum proteins above 5.8 g/dl. What else can be done to assure success?

Photo – Dore Hunt
This calf is born with limited stores of body fat and relies on early intake of colostrum and milk or milk replacer. When dietary intake of energy is limited the calf mobilizes these stores to maintain body temperature and metabolism. Feed them early in life and often!
Now is the time for a high-quality diet with adequate amounts of protein, fat and minerals. It should be noted that milk has about 28 – 35% fat on a powder basis! Now is not the time to be cheap with a calf’s diet. Milk or higher protein and fat milk replacers are better! Now is not the time for a 20:20 milk replacer!
Keys to success for a successful start!
- Feed the youngest calves first. This is important from a biosecurity perspective and because their needs are most critical.
- Check the temperature! It should be between 100 to 110F (38 – 43C). Too hot and it discourages intake and too cold and the calf uses energy to stay warm.
- Feeding frequency. Although it’s a pain, here is where more frequent feeding pays off.
Focus on getting calves started on the autofeeder.
- In most cases it’s wise to start calves in individual pens as one can monitor intake and calf behavior. It’s normal to see a wide variation in how calves get started.
- Set a goal of starting calves on the autofeeder within 3 – 5 days of age. Waiting longer may “teach” them to expect that being fed twice a day is “normal” and not realize that milk is available more often.
- The primary measure for starting calves is to place them on the autofeeder when they have a strong appetite. Some calves are ready in two days and for others it may be longer. https://calfblog.foerster-technik.com/when-is-the-best-time-to-introduce-calves-to-the-autofeeder/
- See the following video on calfblog.com which demonstrates how to train calves to the feeder. https://calfblog.foerster-technik.com/autofeeder-calf-training-tips/. The key here is to feed them a bottle in the AM, place them in the autofeeder pen and sometime after several hours show them the nipple, and press the “training” button to stimulate milk flow. Be gentle and patient!
- Don’t feed calves with a bucket as this doesn’t encourage nursing on the nipple.
- Pay special attention to the feeding behavior shown by the autofeeder on the cloud or Kalbmanager.
The 40fit program allows the calf to drink as much as it wants within 24 hours. However, we limit intake to 2L every 2 hours which prevents the calf from eating too much at one meal. This is a distinct advantage of the autofeeder as compared to feeding calves by bottle when achieving intakes of 8L requires some large meals if calves are only fed twice a day.
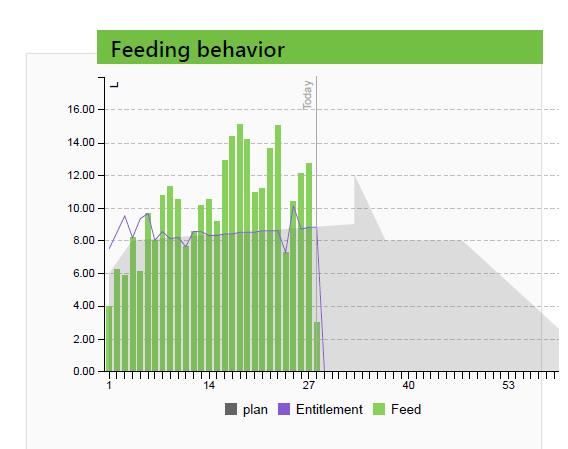
Focus attention on calves consuming less than 4L for more than one day. This is where some judgement comes in to managing these young calves. Check their feeding behavior! What is daily intake? The calf shown below has consumed less than 4L/day for the first few days of life. How much do they consume at each meal? What is their drinking speed? Failure to consume less than 2L/meal may be concerning. Drinking speeds less than .5L/min indicate less than aggressive eating. This calf may need another training session but don’t do this too often as it may make them dependent upon the person.

Make sure that the autofeeder is functioning to its full potential.
- Calibrate the weights and liquid flow rates if warnings are shown.
- Make sure the system is clean!
- Newer machines will automatically clean all the way to the teat. It’s recommended to have at least three automatic cleanings / day and 4 is even better. Schedule these when feeding stall occupation is likely to be slow.
- Older machines may utilize a circuit clean function which requires operation assistance.
- Hand clean and rotate nipples at least daily. Discard them where there is the slightest indication of wear or cracks.
- This video demonstrates the fundamentals of cleaning the autofeeder. There have been improvements in the newer systems. It’s interesting to note that this feeder has been in use for several years and looks like it just came from the factory. https://calfblog.foerster-technik.com/how-to-clean-the-calf-autofeeder/ Scub the area around the teat and inside the door.
- Remember that this animal is a young mammal with similar needs as human infants.
In summary, pay attention to warnings and notices from the feeder. There are quick start guides included on the calf blog site (calfblog.com) that lead one through how to do various things with the feeder. Pay attention to calf feeding behavior. Each morning walk the pens and note animal behavior – calves lying away from the group, dehydration, poor hair coat, drooping ears……. Consult the information contained either on the handheld, the calf cloud or calf manager. These technologies are a valuable asset in the early detection of disease. Pay special attention to calves during the first 3 to 5 days on the feeder! Calves respond well with early detection of problems. Just because the feeder is delivering milk one should not assume that “all is well”. Manage these calves less than 7 days old intensively and one can prevent many later problems.